 E-mail Servers
This tool allows a virtual machine without a public IP address,
to work as a public email server on the Internet, for both sending
and receiving messages.
To do so, the VM must have either a Private IP or an IPv4 NAT
address, (see types
of IP addresses) and must be configured with proper email
management software, (SendMail, PostFix, Exchange, etc)
Your email system must be configured to work without
encryption, The Cloud-Bricks Network will handle
external encryption for you, using secure protocols like POP3s,
IMAPs, SMPTs and SMTP-STARTTLS. (See also SSL Certificates)
Creating an email server
Once you have a virtual machine configured and running as an
email server, you may proceed with the cloud configuration:
Go to Cloud Services > E-mail Servers from the menu on
the left.
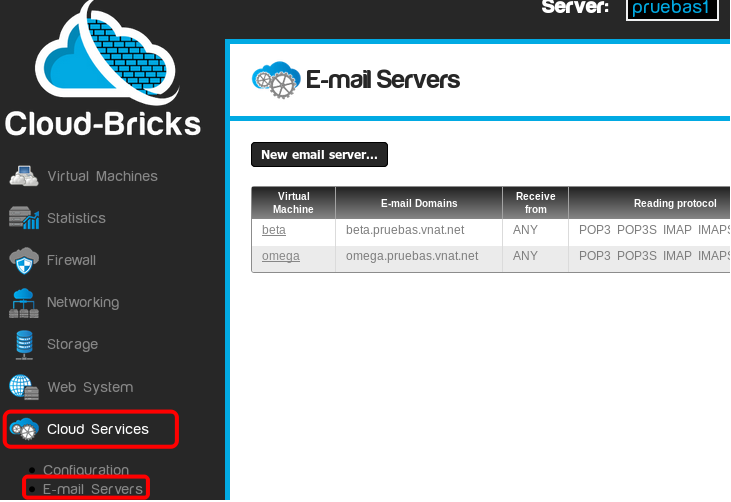
Click on the New email server... button.
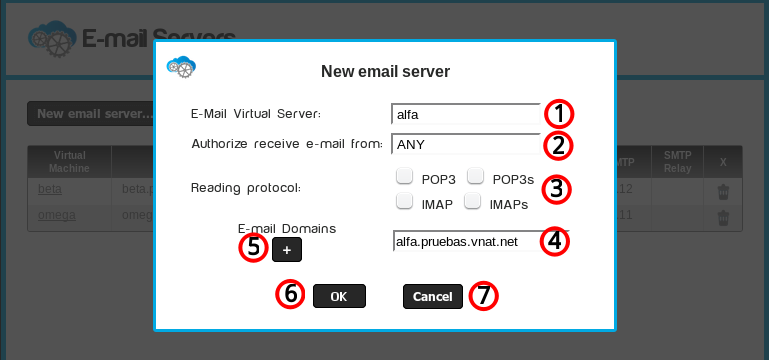
- Virtual machine configured as an email server.
- Networks that are allowed to send email to your VM using SMTP
or SMTPs
- This is useful if you want to restrict access.
- The networks which appear in this list can be managed in the Firewall Hosts and networks section.
- Protocols for email reading.
- Cloud-Bricks manages the encryption for secure
protocols (IMAPs and POP3s).
You should buy an SSL certificate for your virtual machine.
See also How configure digital certificates
- If you want to provide POP3 (port 110) or POP3s (port 995), your VM must support the POP3 protocol.
- If you want to provide IMAP (port 143) or IMAP3s (port 993), your VM must support the IMAP protocol.
- Your VM must permit plain password authentication.
(Cloud-Bricks will encrypt the passwords for remote access using SMPTs or STARTSSL)
- Cloud-Bricks manages the encryption for secure
protocols (IMAPs and POP3s).
- Email domains that will be managed by this VM.
- By default the system offers a default domain name useful for testing.
- The default domain corresponds to your vm name in the format: <virtual_machine>.<customer_name>.vnat.net
- That default domain already has the required MX records
for a fully functional email system.
- Button to add more domains, it is possible for a single virtual machine to serve multiple email domains.
- OK button: Updates the list of email servers. (Commit
required to finish configuration)
- Cancel button. Discards all changes.
Once you have added the email server, click on the Commit
Changes button to generate the necessary network
configuration.
DNS Configuration
To make your email system work to perfection, you will need to
create some records in your DNS server:
MX Record
The MX record is used to inform which is the incoming email
server for your domain. Your Virtual Machine has a Fully Qualified
Domain Name with the following format: <virtual_machine>.<customer_name>.vnat.net
For instance, if your Cloud-Bricks system is called
"mycompany1,cloud-bricks.net" , and your VM name is "emailserver"
then you must configure the following MX record:
@ IN MX 10 emailserver.mycompany.vnat.net.
SPF or TXT Record
The SPF record informs which are the authorized servers to send email on behalf of your domain. It is very important to configure these records to avoid your email being identified as SPAM.
In order to create the SPF record you will need to get the IP address of your Cloud-Bricks system, to do so, you may use the nslookup program. For instance if your system name is "mycompany1,cloud-bricks.net":
# nslookup mycompany1.cloud-bricks.netThen you must configure the following records in your email Domain's DNS server:
Server: 8.8.8.8
Address: 8.8.8.8#53
Non-authoritative answer:
Name: mycompany1.cloud-bricks.net Address: 74.50.112.123
@                       IN      TXT     "v=spf1 a mx ip4:74.50.112.123 ~all"
@                       IN      SPF     "v=spf1 a mx ip4:74.50.112.123 ~all"
The TXT record is used for backwards compatibility purposes with systems not supporting the SPF record.
PTR Record
The PTR or Inverse DNS record is used to veryfy that an email system is truly who it claims to be. The idea is to verify that the system's IP address corresponds to its name and vice versa.
The PTR records must be requested through our support service, because only Cloud-Bricks can create them.
To check if your cloud system has correctly configured PTR records, you should get your system's name when performing a PTR request using your system's IP address:
# nslookup
> set querytype=PTR
> 74.50.112.123
Non-authoritative answer:
123.112.50.74.in-addr.arpa name = mycompany1.cloud-bricks.net.
If this query returns an error message, please contact our support service.
SMTP Security
Using the Cloud-Bricks system to handle your email servers have the following security benefits:
- Efficiency: Encryption is performed at the hardware level, freeing virtual machine resources.
- Simplicity: You do not have to deal with all the complexity of configuring SSL certificates and managing password ciphers: You only have to configure plain password authentication in your email VM, and plain SMTP and POP/IMAP access. Cloud-Bricks will encrypt all the traffic for you.
- Junk email: The system will reject any email coming from servers black-listed at SPAMHAUS.
- Threat protection: All email traffic will pass through our Intrusion Prevention System.
How to Setup an email Server
These are basic instructions about how to install email
management software on both Linux and Windows virtual machines.
For more detailed information please refer to your Operating System
documentation.
Mail Server on Linux
In Linux usually the Postfix and Dovecot packages are used to handle
email services. Therefore you must have a virtual machine already installed
with the base operating system, for this example Ubuntu will be
used.
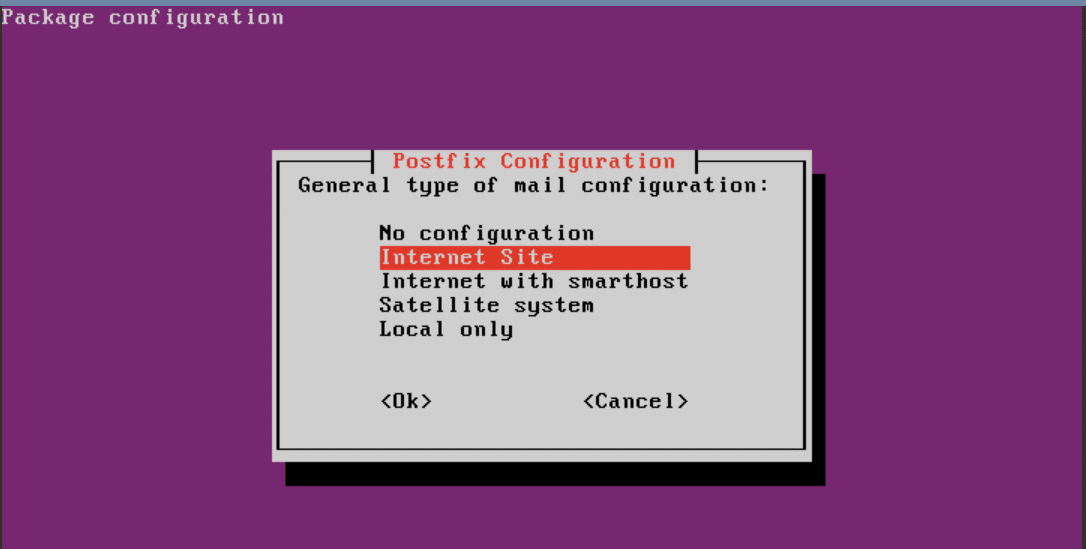
Install Postfix package with the command
#apt-get update
#apt-get install postfix
During installation select Internet Site as type of mail configuration.
Enter the mail server name.

Configure Postfix to use SMTP-AUTH of Dovecot, adding the following lines in the file /etc/postfix/main.cf.
home_mailbox = Maildir/Find the line myhostname anb configure the server's name by replacing "localhost' with the VM's FQDN which has the form:
smtpd_sasl_type = dovecot
smtpd_sasl_path = private/auth
smtpd_sasl_local_domain =
smtpd_sasl_security_options = noanonymous
broken_sasl_auth_clients = yes
smtpd_sasl_auth_enable = yes
smtpd_recipient_restrictions = permit_sasl_authenticated,permit_mynetworks,reject_unauth_destination
smtp_tls_security_level = may
smtpd_tls_security_level = may
smtp_tls_note_starttls_offer = yes
smtpd_tls_loglevel = 1
smtpd_tls_received_header = yes
<virtual_machine>.<customer_name>.vnat.net
For example:
myhostname = virtualmail.mycompany.vnat.net
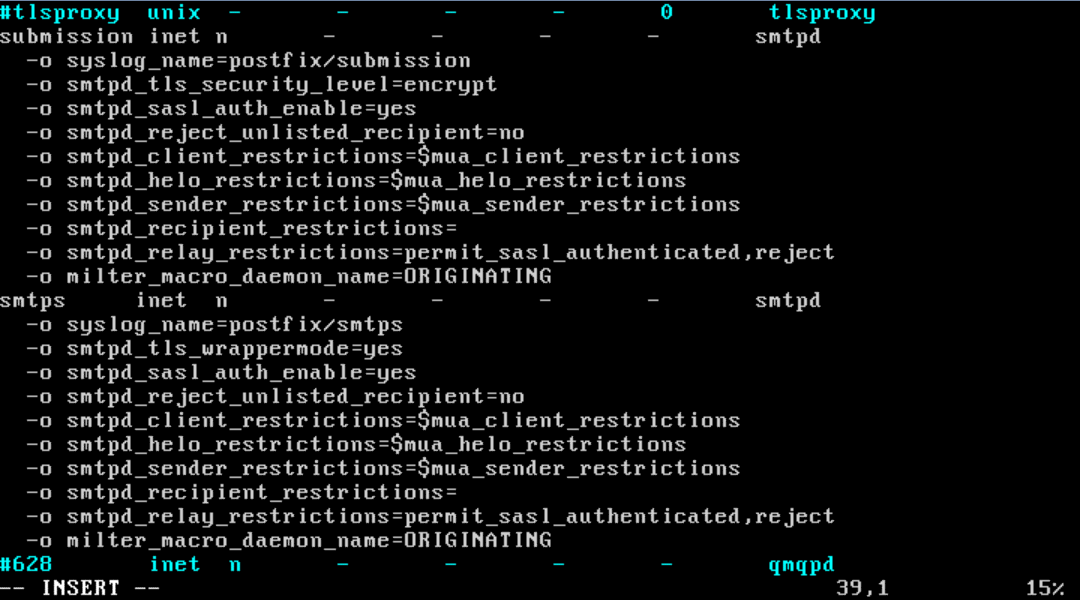
Open the file /etc/postfix/master.cf and uncomment the lines to enable SMTPS and SUBMISSION well.
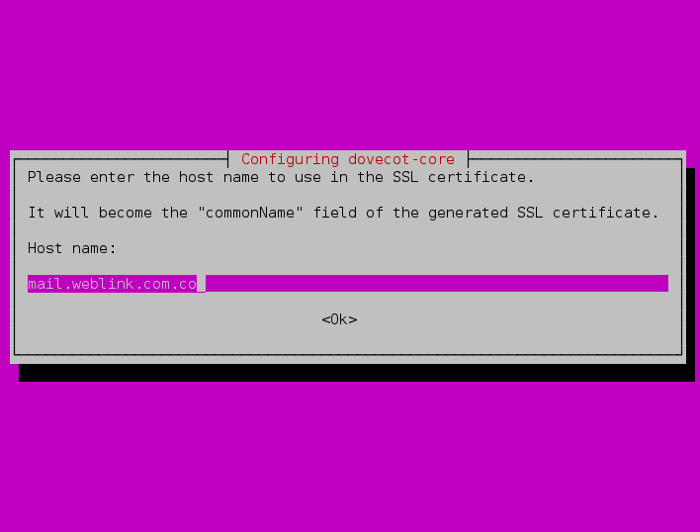
Now, install Dovecot SASL with the command.
#apt-get install dovecot-common
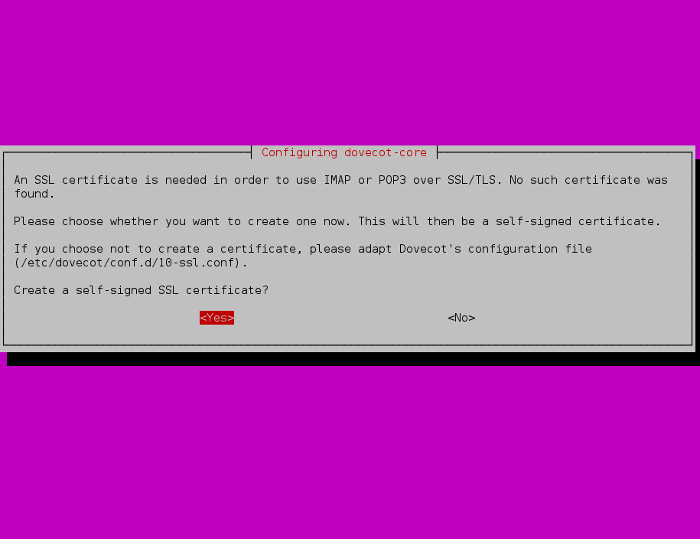
Answer YES, and type the mail server name.
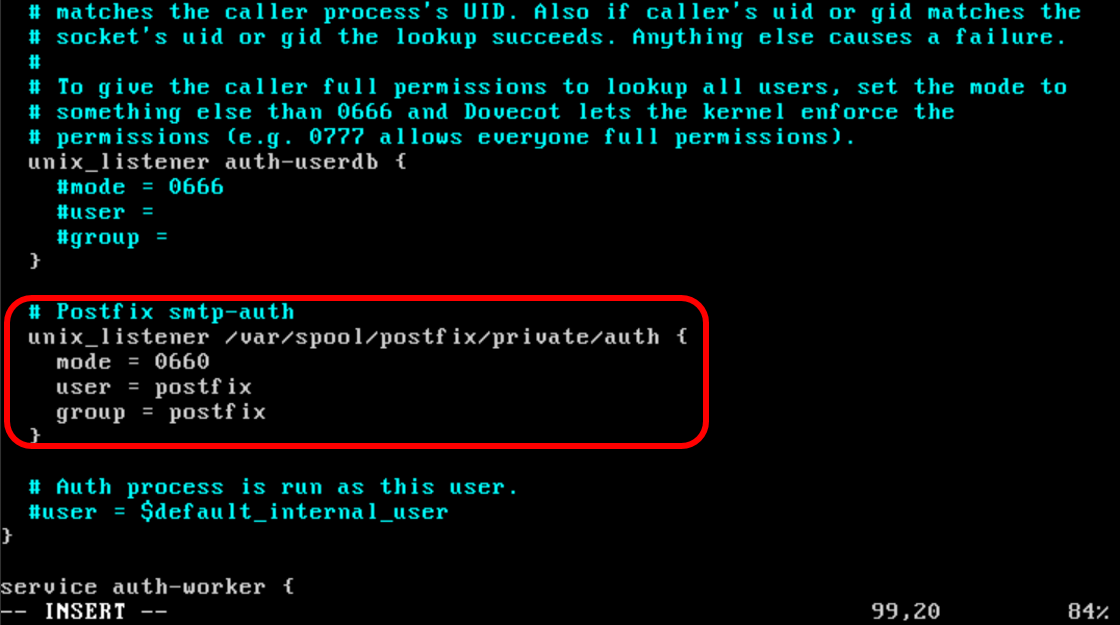
Now, edit the file /etc/dovecot/conf.d/10-master.conf and search the line
# Postfix smtp-auth(Usually near line 95 of the file), and add the following.
# Postfix smtp-authIt should look like:
unix_listener /var/spool/postfix/private/auth {
mode = 0660
user = postfix
group = postfix
}
Open the file /etc/dovecot/conf.d/10-auth.conf and enable plain authentication:
disable_plaintext_auth = noDo not worry, Cloud-Bricks will encrypt the passwords for you if you choose the POP3s or
IMAP4s secure protocols.
In the same line look for the line:
auth_mechanisms
(usually near line 100), and change it to:
auth_mechanisms = plain login
Restart postfix and dovecot.
# service postfix restartTry Telnet to check SMTP response.
# service dovecot restart

Install IMAP and POP3 support.
#apt-get install dovecot-imapd dovecot-pop3dEdit the file /etc/dovecot/conf.d/10-mail.conf and find the line:
mail_location
Modify the line so it looks like this:
mail_location = maildir:~/Maildir
Now edit POP3 settings in the /etc/dovecot/conf.d/20-pop3.conf file. Locate and uncomment the following line:
pop3_uidl_format = %08Xu%08Xv
Restart Dovecot.
service dovecot restartRun telnet command one more time.

Create an email account:
# useradd -m bobby -s /sbin/nologin
# passwd bobby
The basic configuration is ready. Now you may create user accounts and configure your email server. Please refer to PostFix and Dovecot documentation for detailed information.
Mail server On Windows
A Windows server normally uses Microsoft Exchange as email service. Therefore you must have a virtual machine already installed with the Windows Operating system.Windows CORE would suffice. The server must be part of a domain.
Install prerequisite software:
C:\> Install-WindowsFeature AS-HTTP-Activation, Desktop-Experience,Install Exchange Server 2016 Edge Transport server:
NET-Framework-45-Features, RPC-over-HTTP-proxy, RSAT-Clustering,
RSAT-Clustering-CmdInterface, RSAT-Clustering-Mgmt,
RSAT-Clustering-PowerShell, Web-Mgmt-Console, WAS-Process-Model,
Web-Asp-Net45, Web-Basic-Auth, Web-Client-Auth, Web-Digest-Auth,
Web-Dir-Browsing, Web-Dyn-Compression, Web-Http-Errors,
Web-Http-Logging, Web-Http-Redirect, Web-Http-Tracing, Web-ISAPI-Ext,
Web-ISAPI-Filter, Web-Lgcy-Mgmt-Console, Web-Metabase,
Web-Mgmt-Console, Web-Mgmt-Service, Web-Net-Ext45, Web-Request-Monitor,
Web-Server, Web-Stat-Compression, Web-Static-Content, Web-Windows-Auth,
Web-WMI, Windows-Identity-Foundation
C:\> Install-WindowsFeature ADLDSInstall Active Directory:
C:\> Install-WindowsFeature RSAT-ADDSCopy the Exchange installation files to a local directory.
From the console, enter the directory and run the installers.
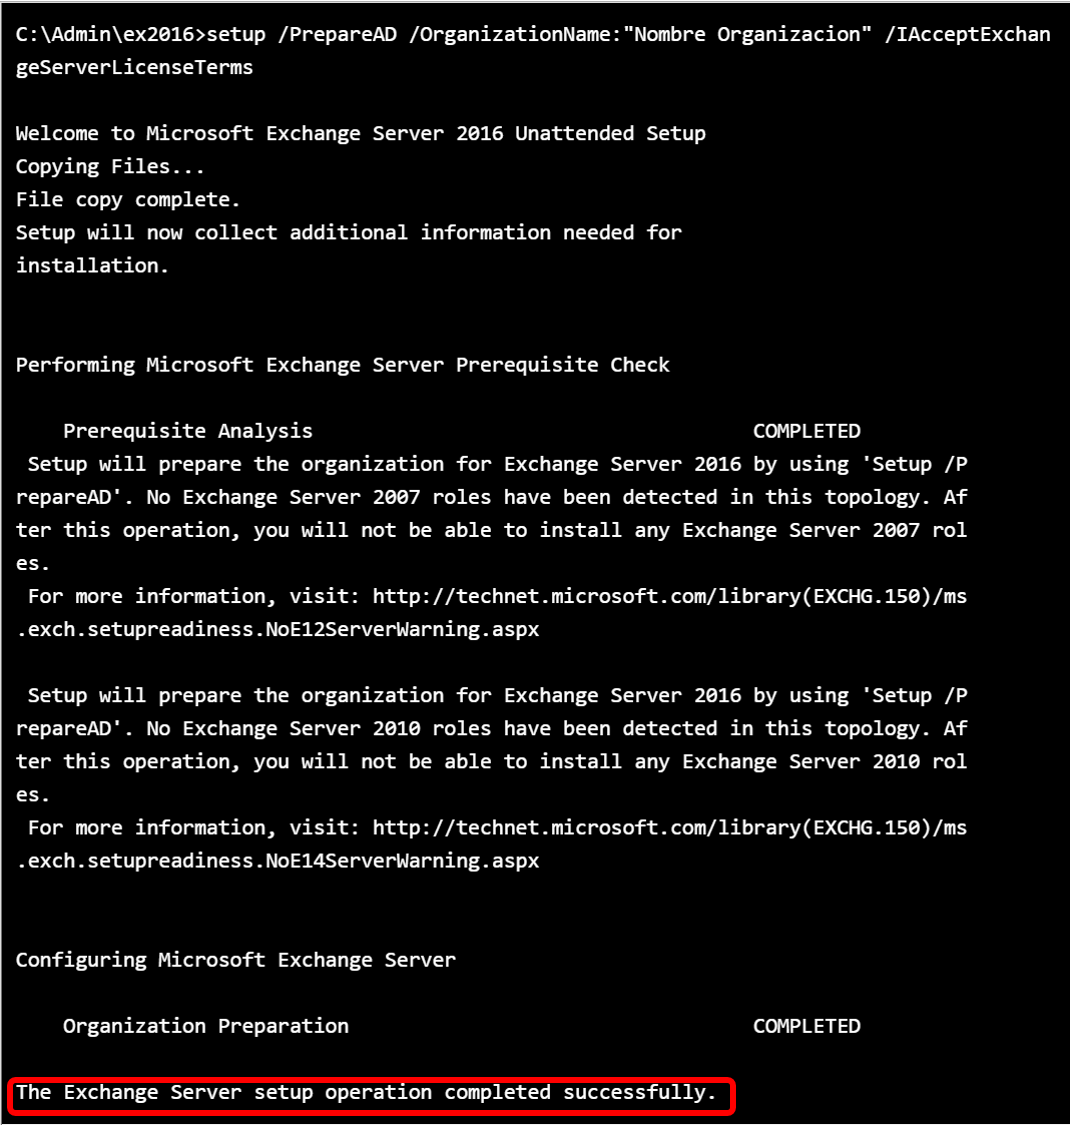
Inform the name of the organization to the Exchange server.
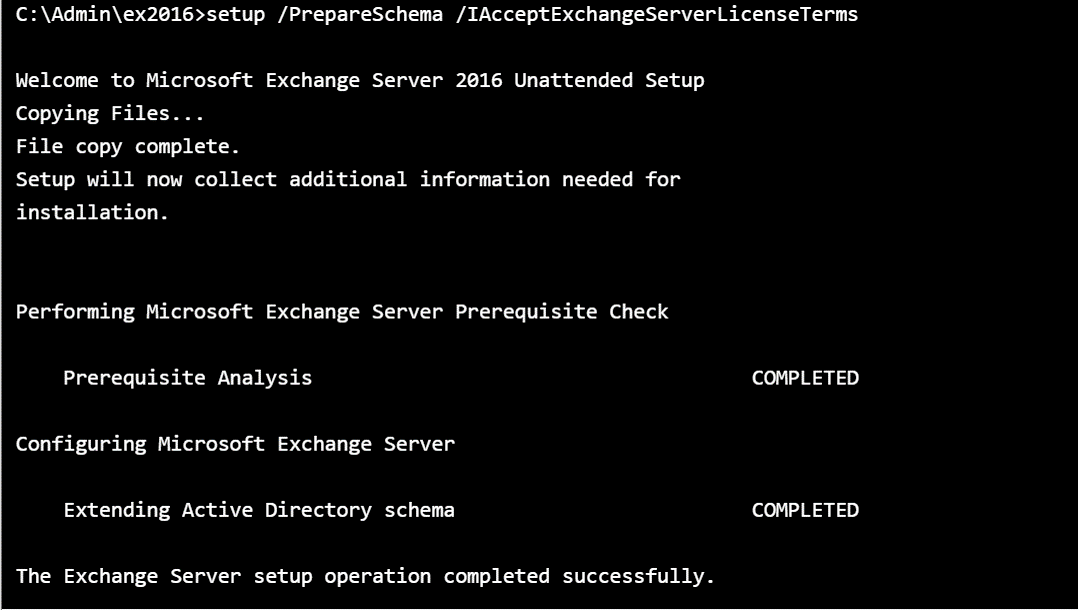
C:\Admin\ex2016>setup /PrepareAD /OrganizationName:"Organizarion Name" /IAcceptExchangeServerLicenseTermsThe installation process begins.
The role of MailBox server has all the necessary elements for exchange.
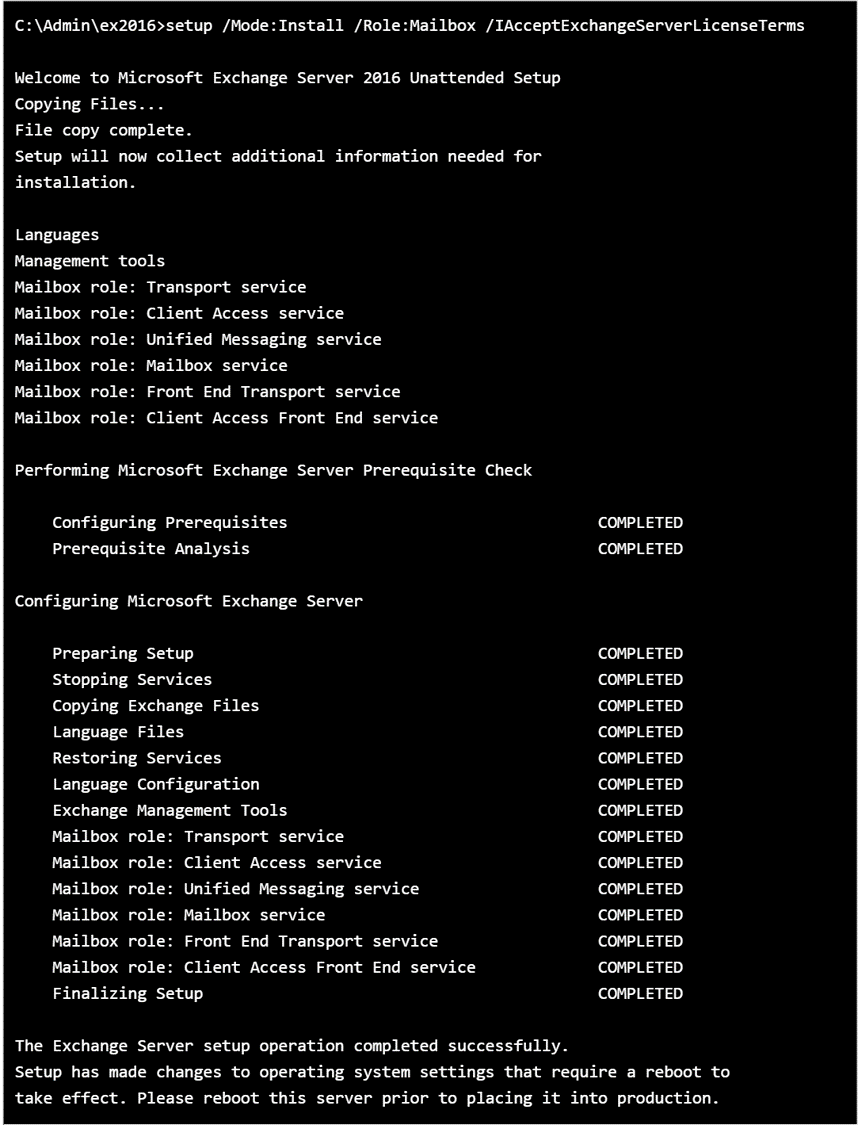
Now the server is ready for operation.
Managing SSL Certificates
When an email server is created it is necessary to use digital certificates to handle secure communication between clients and the server. This is required to activate the SMPTS, STARTLS, POP3S and IMAPS secure protocols. The details of how SSL certificates work are in the section of SSL Certificates.
We recommend to buy your SSL Certificates from a trusted Certification Authority, Self-Signed certificates are only useful for testing purposes and do not work with big email networks like Outlook.com or Gmail.
Go to Web System > SSL Certificates. Click on the Generate CSR... button and select the "eMail/POP3s/IMAPs Certificate" option.
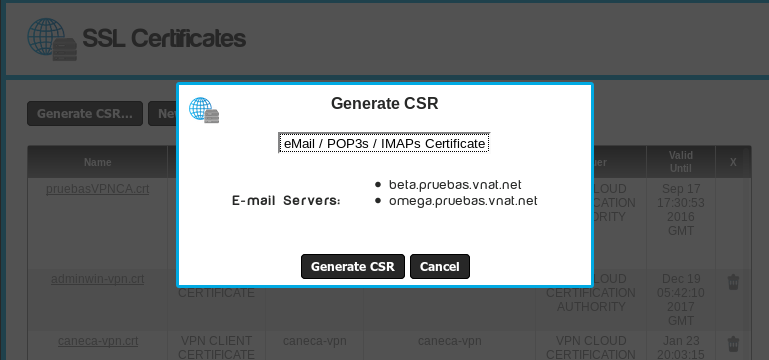
The certification authority will request this CSR (Certificate Signing Request) in order to generate your SSL certificate.
When your receive the certificate file, you may use the SSL Certificates interface to upload it to the Cloud-Bricks system.
Email client setup
Outlook on Windows
Outlook is the preferred email client for Windows, it supports secure connections and is the natural client for MS exchange.
Your VM must be configured with plain POP3 Access and plain password authentication.
Open the wizard and select "Manual setup or additional server types"
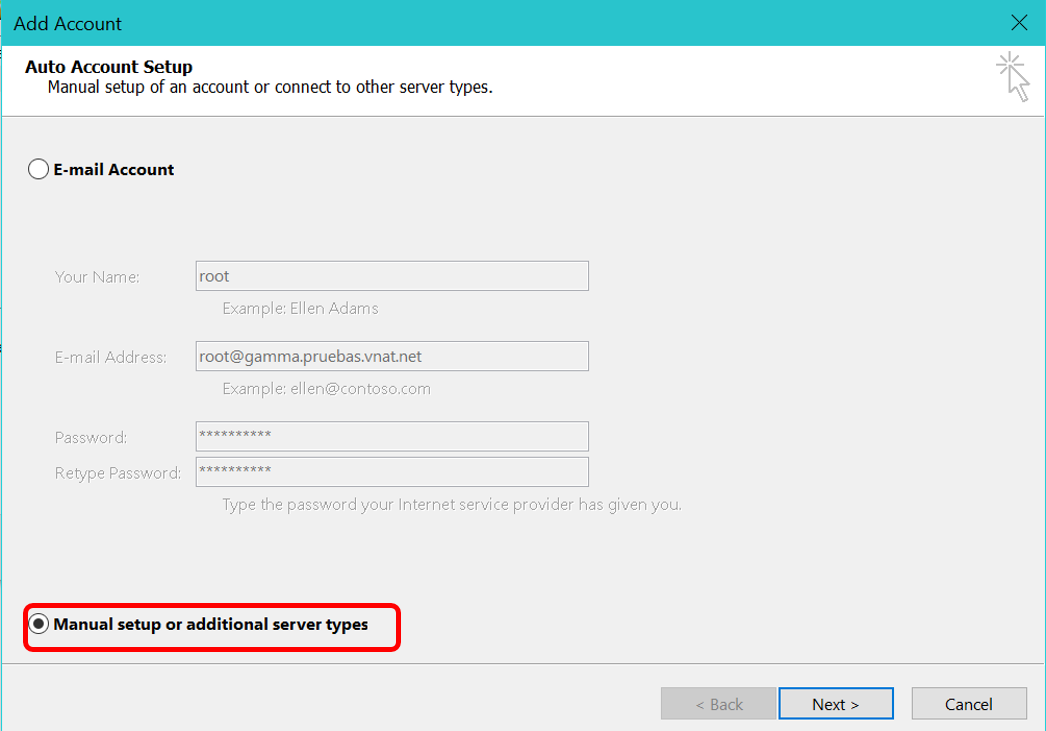
Put your information here, as below
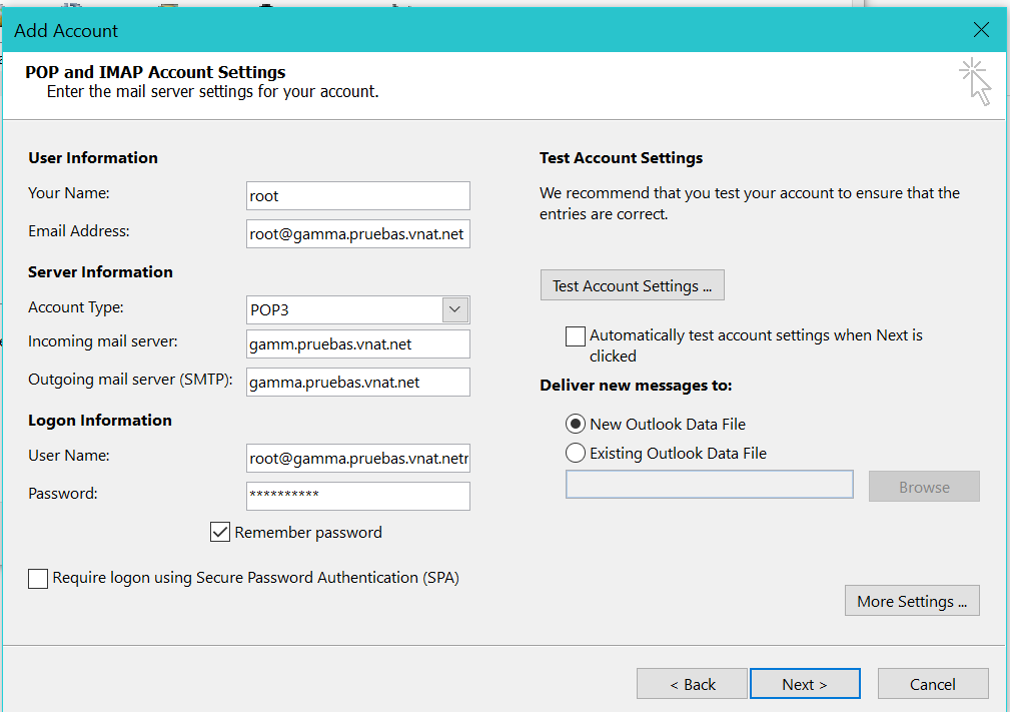
Click in the More Settings buttons and select the SSL protocols.
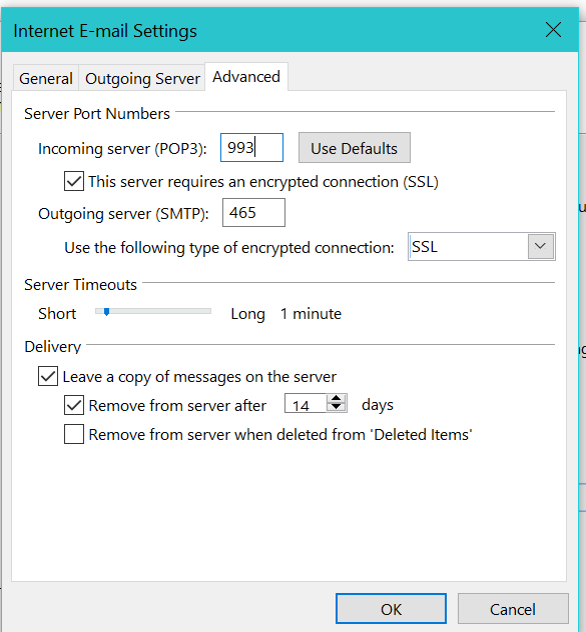
Click in OK. Then, your account will be added
Thunderbird on Linux
Thunderbird is a free, open source, cross-platform email client developed by the Mozilla Foundation.
Installing a certificate
If you are working with Self-Signed certificates then you must install the "SSL certification Authority" in Thunderbird.
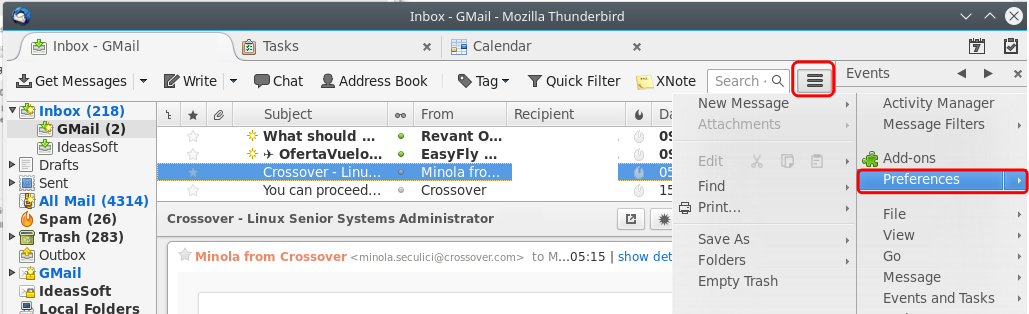
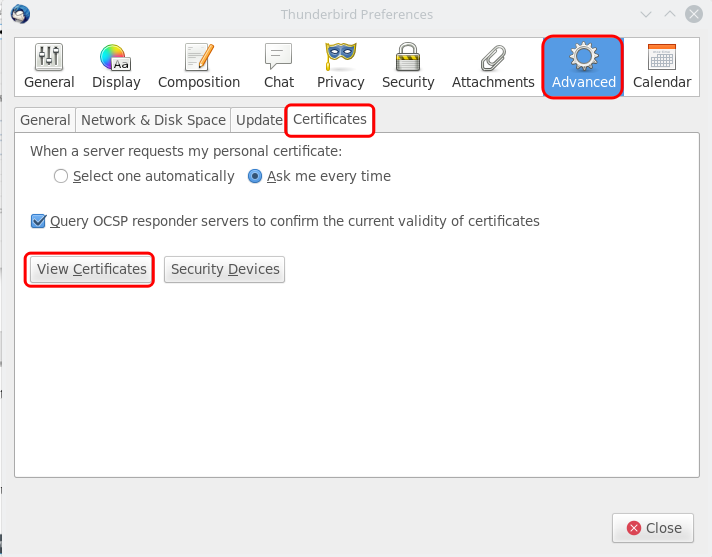
Open Thunderbird, and click the Application menu button, choose Preferences.
Go to The "Advanced" option, choose the "Certificates" tab, click on View Certificates button:
You have to download the <customer_name>MAILCA.crt certificate file, from the SSL Certificates page.
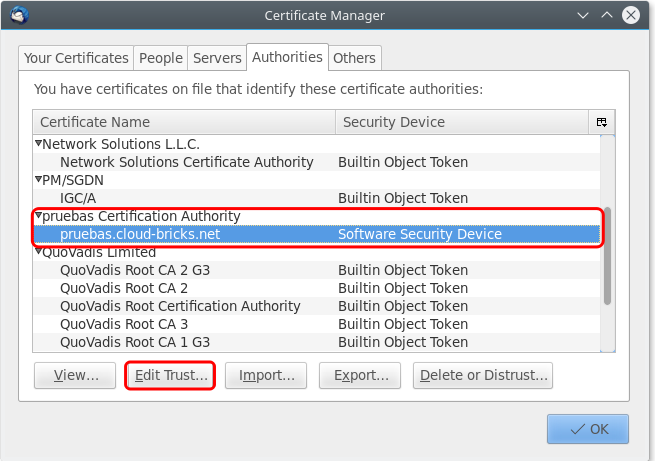
Open the tab "Authorities", click on Import and browse the previously downloaded certificate. When the certificate is loaded, choose the CA, and click on "Edit Trust...":
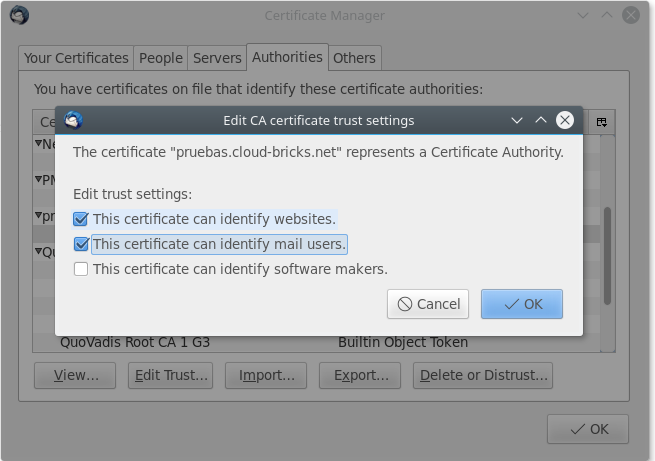
With every root-certificate you import, you'll be asked for what you'd like the certificate to be trusted.
Select both: "Trust this CA to identify email users" and "Trust this CA to identify websites"
Now, we can add our email account. In this example we are using the IMAP protocol for email reading.
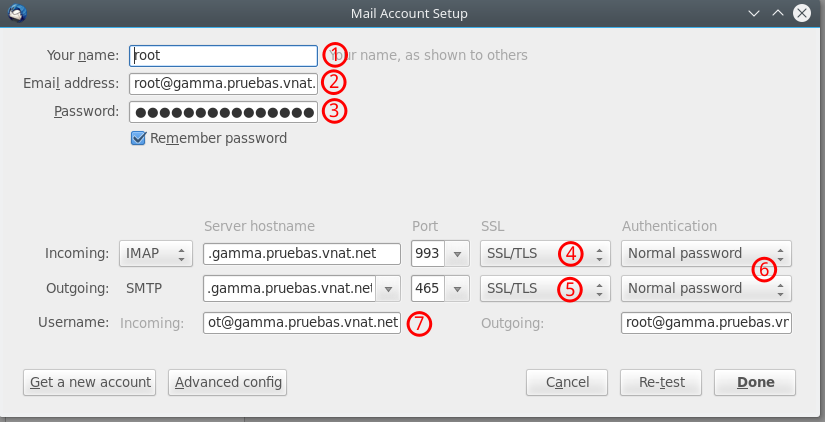
- Your Name
- Your e-mail
- Your password
- Choose SSL/TLS
- Choose SSL/TLS
- Very important to select Normal password here
- You have to put your complete email here too.
Mail on MacOS
"Mail" is an email client included with the OS X series of operating systems, iOS and watchOS by Apple.
Installing Certification Authority
If you are working with Self-Signed certificates then you must install the SSL certificate in the operating system.
You have to download the <customer_name>MAILCA.crt certificate file, from the SSL Certificates page.
Now double-click the <customer_name>MAILCA.crt file and press the "Add" button.
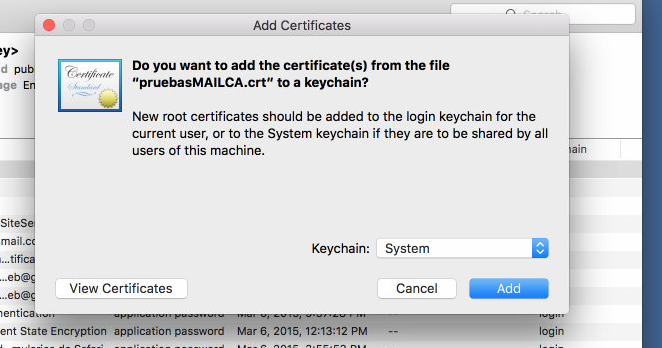
Your admin credentials will be requested. The CA certificate will be installed.
Configuring an email account
Now open the mail App, and go to "Accounts". Click on "Add"

Fill the SMTP configuration data. In this example we are using IMAP as reading protocol.
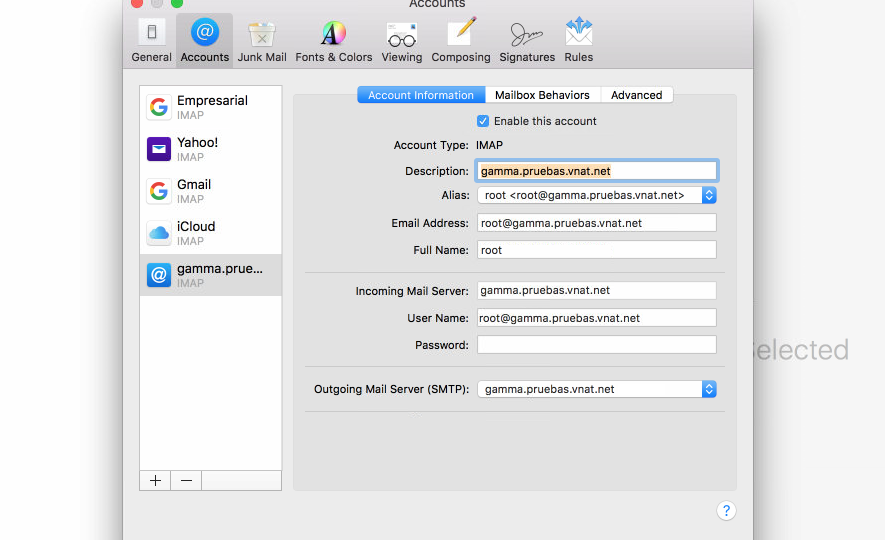
Please be sure that you use the complete mail address as user name. Your email account now is ready to use.