
 Virtual Hosts - Web sites
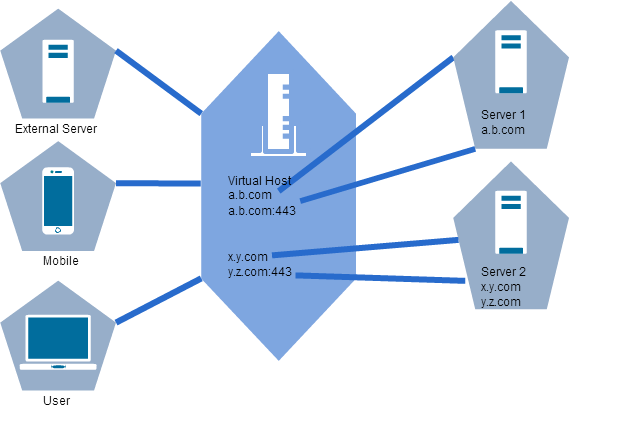
Basic concepts of Virtual Host
To understand how it works and how to configure a Virtual Host, several related concepts need to be learned.
Domains
Domain names are the names used on the Internet to identify networks of organizations. For example, cloud-bricks.net or google.comWeb sites that configure can be associated with one or more domains.
HTTP/HTTPS protocol
HTTP is the communication protocol that allows a browser talk to a Web server to exchange data. HTTPS adds a layer of security in communication, enabling data encryption using TLS/SSL. To configure a Virtual Host HTTPS, you must first configure a digital certificate.
Locations
Locations are elements that allow separate a Website in areas or different folders each with independent settings.From a location you can set access restrictions, indicate which HTTP server must manage content, generate and control the cache redirects.
The locations can restrict access using IP addresses configured
on the list of hosts
and networks firewall.
The locations let you to enable and configure the Web Cache mechanism.
The locations also manage the destination of the request, so it
is possible to direct requests from one domain to a specific HTTP
server, or redirect to an external URL. When you set up a
redirect, the destination field appears: put here the url where we
want to redirect the user.
Cache settings in Locations
When inside a Location, the HTTP cache is activated, we have two
options according to the cache headers possessing the application.
See more information on the cache
system.
- Stale Cache: If the reverse proxy has in memory an already expired copy of a page (ie your cache time has expired) and for some reason it is not possible to obtain an updated copy (Example: the web server is offline), then we authorize the proxy to deliver an "old copy" of the site/page by every request. In this way we can deliver an old copy rather than failing to deliver nothing or generate an error.
- Cookie no cache: This option is especially useful when the Web site uses an authentication system, and through a specific cookie indicates that the content generated during the session should not be stored in the cache. By activating this option the field appears to enter the name of the cookie.
Redirect HTTP
The HTTP redirect is an option to send the traffic to external sites. The redirect can be useful for example, if we have a website maintenance and all traffic is redirected to a different site. Redirect is in the field "Destination" within locations. You can choose between two types of redirect:
- Redirect 301 (Permanente): This redirect indicates that the
host has been able to communicate with the server but the
requested file has been moved to another address permanently.
- Redirect 302 (Temporal): This redirect indicates that the host
has been able to communicate with the server but the requested
file has been moved to another address temporarily.
Setup a new Virtual Host
Go to Web System -> Virtual Hosts on the left menu.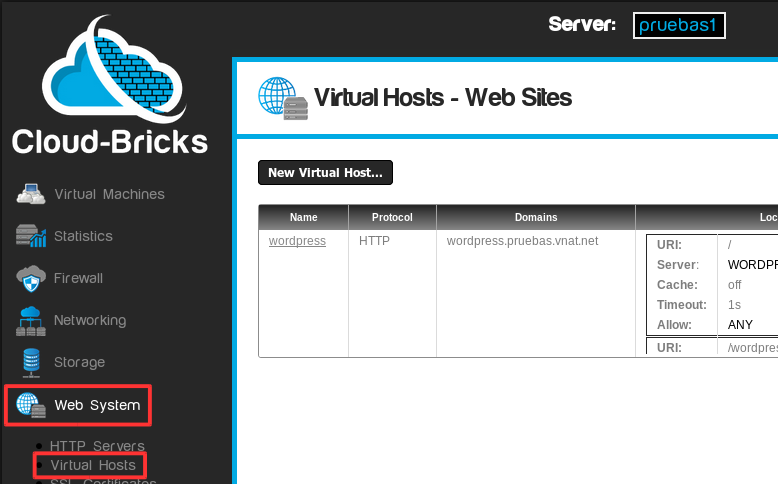
For a website to be visible on the Internet it is necessary to create a virtual host and configure the domains associated with it.
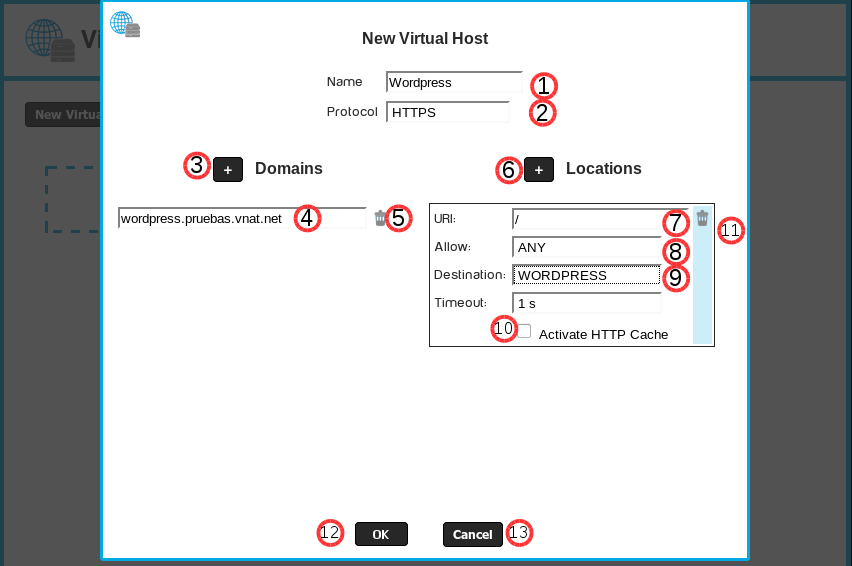
- Virtual host name, there can not be two identical names.
- Website protocol.
- HTTP: Normal protocol for Web sites, without security.
- HTTPS: Secure web protocol, uses SSL security layer. For more information go to the SSL Certificates section.
- HTTP & HTTPS: You will be able to access your website
using secure (HTTPS) and insecure (HTTP) connections.
- Button to add domains: You can setup multiple virtual
domains on a single host.
- Domain name: Here you can add all domains that have been
purchased and are pointing to the Cloud.
We can also put the domain name system default which has the virtualMachineName.customerName.vnat.net format. - Domains delete button: Delete domains that have been added.
- Add Location button: Lets add multiple Locations that can be configured independently.
- URI : A URL is simply a URI that happens to point to a
physical resource over a network
For this example we will use the root of the website "/".
- Access Restriction: You can allow access to a single network
configured on machines
and Networks firewall section.
For this example we will give access to any machine on the Internet with ANY option.
- Virtualhost destination: It is the destination Traffic
Location.
It can be a Redirect 301 or 302, or an HTTP server.
For more information go to the HTTP Servers section.
For this example we will use a previous HTTP server called WORDPRESS.
- Option to enable HTTP cache Cloud-Bricks. For this example we'll leave unchecked.
- Locations delete button: You can delete Locations created, this
task is irreversible.
- OK button: When you click it, the Virtual Hosts list in the previous screen is updated.
- Cancel button: Cancels operations made.
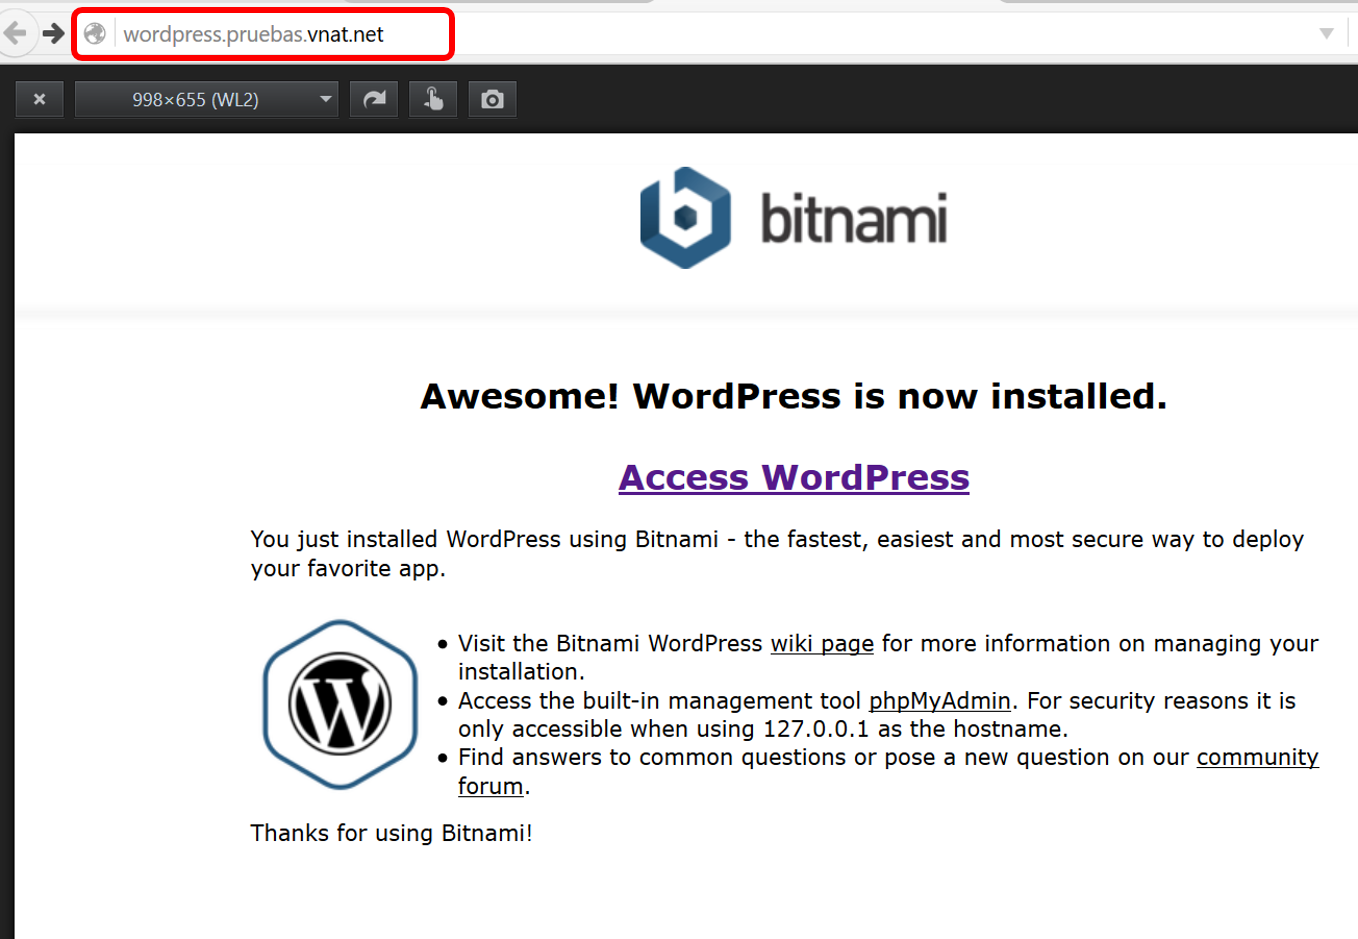
Click on the OK button and then click Commit Changes
to save the changes. You can now access the web site using any of
the configured domains.
Restrict access to a folder
For security reasons, it is often necessary to restrict access to a directory or URL of the portal. For example when you are creating a new section of a portal which is in the URI /sports we can restrict access to only developers can join. Next, an example.
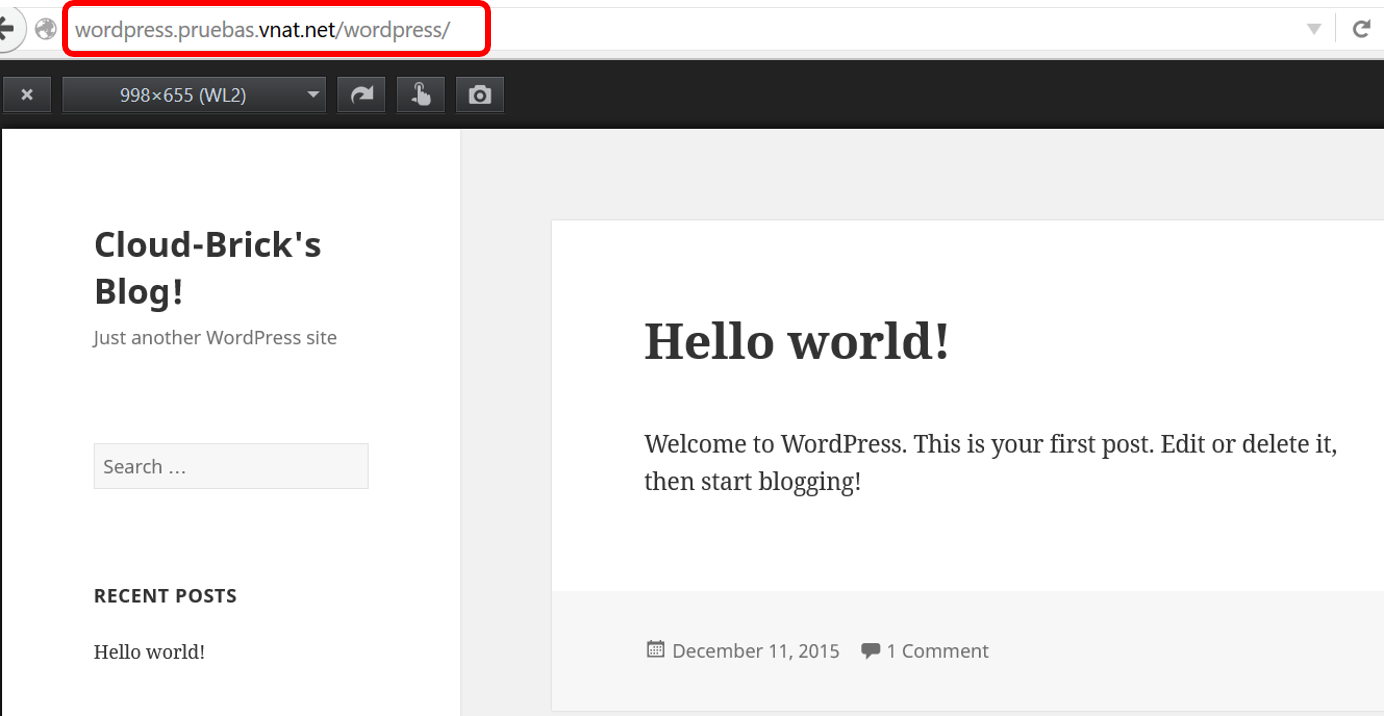
It has created the web portal that responds http://wordpress.pruebas.vnat.net/
Now, go to http://wordpress.pruebas.vnat.net/wordpress/, a Wordpress installation is shown.
Now change the Virtual Host corresponding to restrict access to the URL http://wordpress.pruebas.vnat.net/wordpress/.
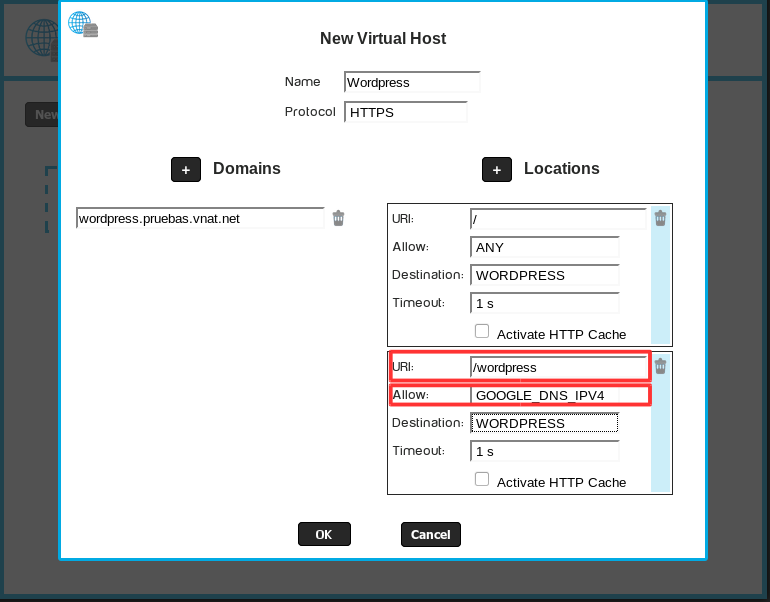
In the "Allow" field choose the network that will have exclusive access to the URI of /wordpress, for this case choose the GOOGLE_DNS_IPV4 network. By entering the URL again http://wordpress.pruebas.vnat.net/wordpress/ access is restricted.
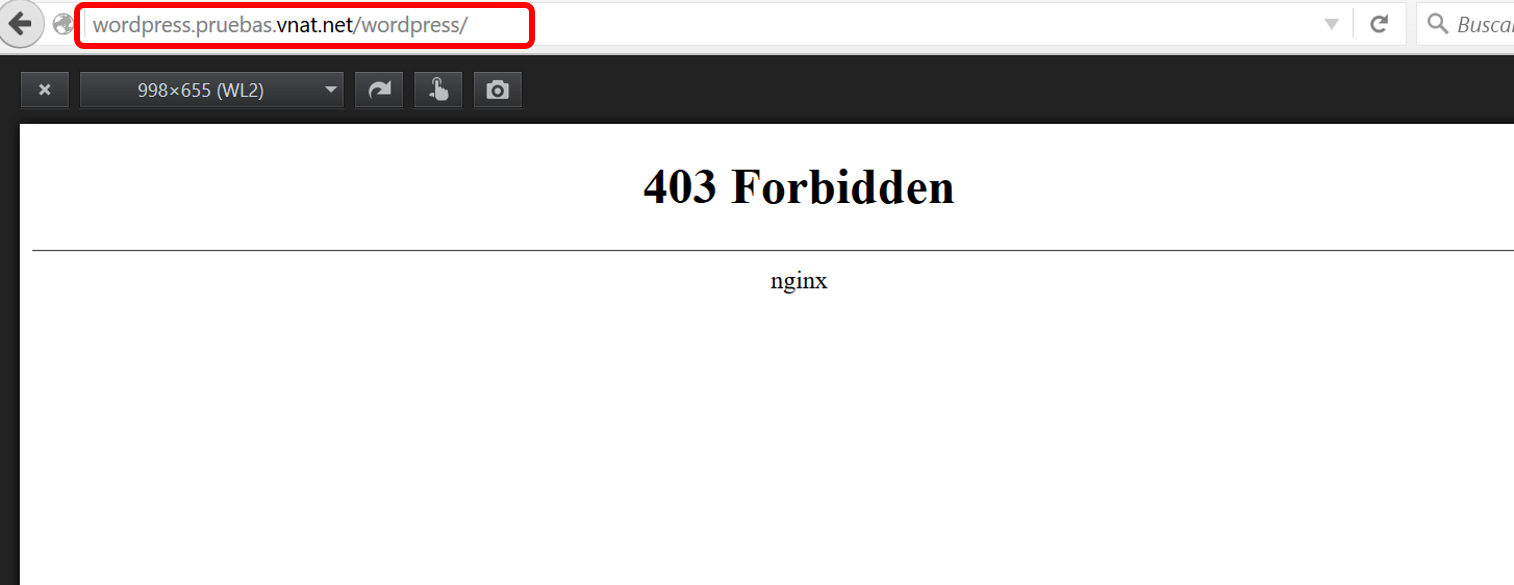
Go again to the main URL http://wordpress.pruebas.vnat.net/ remains normal in the rest of the site.
Redirects
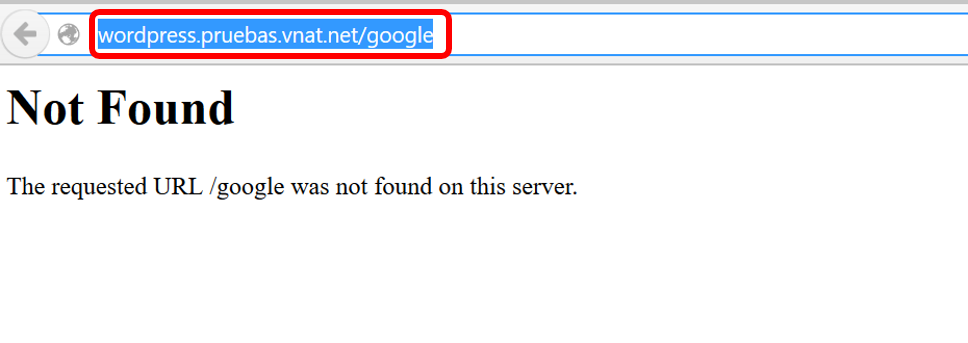
The redirect are useful for controlling access to portals development or maintenance option. You can redirect traffic to external sites or servers. To add a redirect to a portal is necessary to modify the virtual host configured. For example when entering the web portal http://wordpress.pruebas.vnat.net/google throws 404 error.
Now change the Virtual Host corresponding to include a redirect
to the portal www.google.com
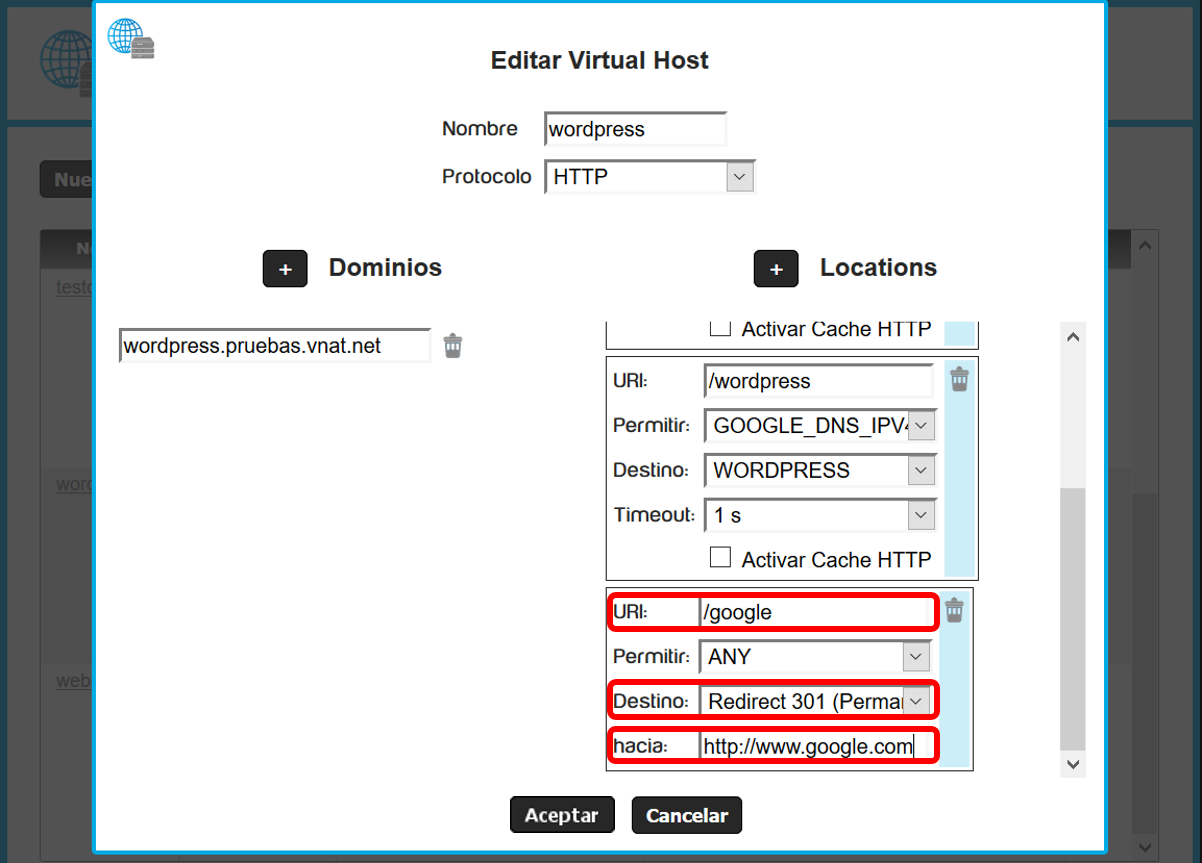
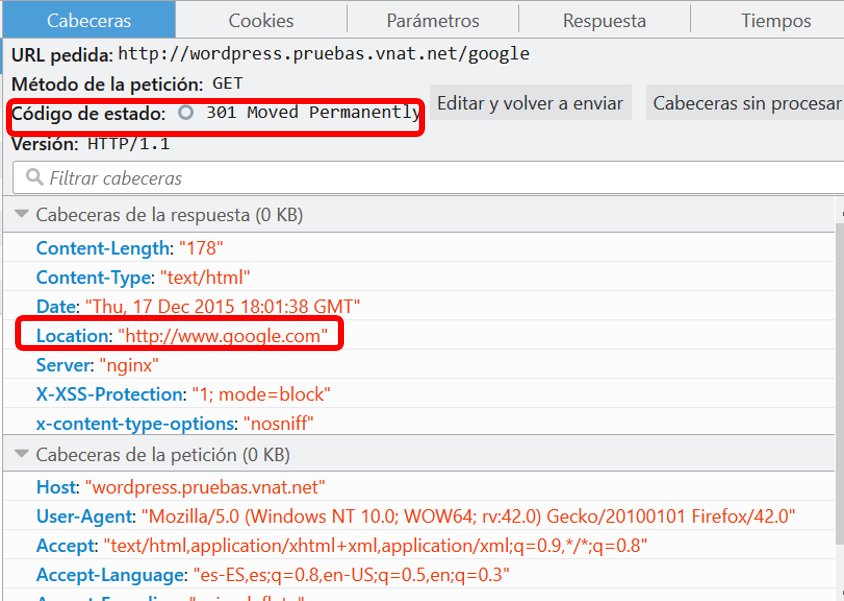
Upon entering the portal http://wordpress.pruebas.vnat.net/google is redirected to http://www.google.com
A website distributed among various HTTP servers
You can make different parts of the same web site are served by different HTTP servers.As an example, suppose we want on our web site, the URI /support is server by a specific HTTP server.
If we have virtual machine as support server(tickets system), you must create an HTTP server pointing to the port and IP of the machine.
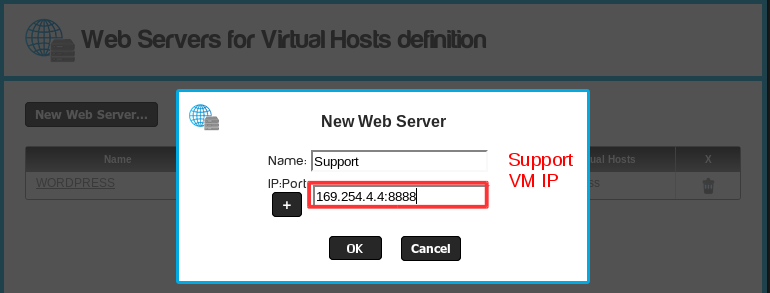
Update List and commit changes. Altering the Virtual Host, Now you can edit the locations and add the new URI, changing the option "Destination" to point to the HTTP server you just created.
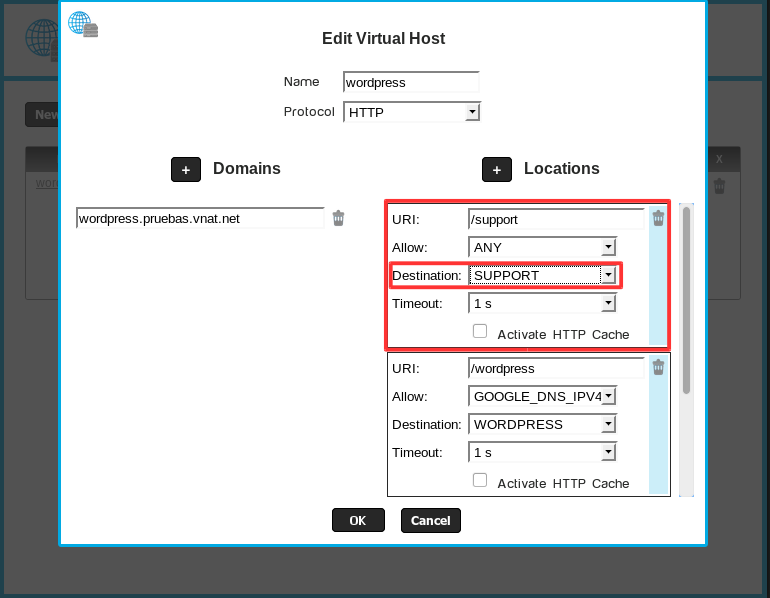
In this way it is possible to create and distribute the locations between different servers.
Creating rewrite and return rules
In the last Version of the Cloud-Bricks platform you may use the NGINX rule engine to create return and rewrite rules in order to control how your web sites behave according to different conditions.Previous knowledge in Regular Expressions is required in order to be able to configure rewrite rules. Perl syntax is used, however no quotes (" , ') neither slashes (/) are necessary to enclose regular expressions.
Please refer to the NGINX documentation for additional information about use cases.
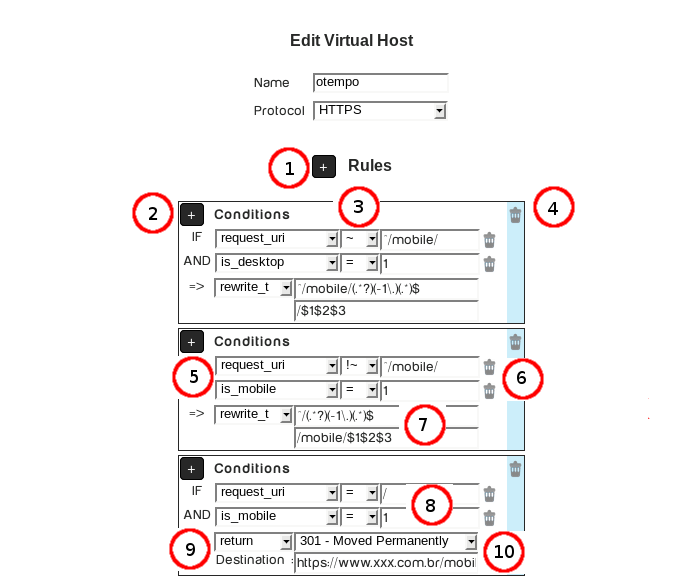
- Use this button to add new rules
- Use this button to add conditions to a rule.
- Comparison Operators menu: Used to select the operator used to compare the variable to the left with a regular expression to the right.
- = : Equals. Validates if the
value of the variable is exactly equal to the text to the
right.
- ~ : Match. Validates if the
variable matches the regular expression to the right, case
sensitive.
- ~* : iMatch. Validates if the variable matches the regular expression to the right, case insensitive.
- != , !~ , !~* : Negative versions of the operators
described above.
- Use this icon to delete a rule.
- Variables menu: Provides a list of the variables that
can be used to create conditions. It is a subset of the list of
variables that NGINX provides.
- host: Indicates the hostname provided in the URL used in the current request.
- http_cookie: Contains the cookies sent by the client.
- http_user_agent: Identifies the kind of client used to perform the request.
- https: Contains the value "on" if the connection is secure. Empty otherwise.
- is_mobile: Contains "1" if the current client is a mobile device. 0 otherwise.
- is_bot: Contains "1" if the current client is a bot or is not a graphical browser client. 0 otherwise.
- is_desktop: Contains "1" if the current client is a desktop computer. 0 otherwise.
- query_string: Contains the text after the "?" character in an URL with parameters.
- request: Full original request line.
- request_method: HTTP Method used in the request ("GET", "POST", "HEAD" , etc)
- request uri: Full original request URI (with arguments).
- remote_addr: IP address of the client or proxy executing the request.
- remote_port: IP port used by the client or proxy when executing the request.
- scheme: Request scheme, “
http” or “https” - Use this icon to remove conditions from a Rule.
- When writing rewrite rules, two regular expressions must be provided:
- Match regular expression: Indicates the pattern that the current URI must match in order to apply the rule.
- Replacement regular expression: Indicates the pattern used to modify the URI if the match was successful.
- Use this fields to write the regular expressions used to compare the variables (5) with the operators (3).
- Actions menu: Use this menu to select what the rule must to if all the conditions are evaluated to true:
- return: Answer the request with a HTTP code.
- rewrite_i: Internal redirect. Use regular expressions
to match/replace the current URI without sending any redirect
to the client. The URI will be modified before sending it to
the back end virtual machine web server.
- rewrite_t : Use regular expressions to match/replace the current URI and issue a HTTP 302 Redirect back to the client if the match is successful.
- rewrite_p: Use regular expressions to match/replace the current URI and issue a HTTP 301 Redirect back to the client if the match is successful.
- Fields for returning HTTP codes in return rules:
- For codes 3XX (redirects) an absolute URL must be provided as the redirect destination.
- Special non-standard code 444 is used to close the current connection without sending any answer to the client.
- Other codes may send an optional response text to the
client.
Please do not hesitate to contact our support team if you need help to configure these kind of rules.